Showing posts with label diy. Show all posts

Thursday, September 19, 2013

DIY No-Sew {5 minute} Stroller Handle


i have a new friend who lives in our neighborhood and we have gone for walks together a few times. she has a double stroller for her two boys and it came with handles attached for kids to hold on to as they walk next to the stroller. it's genius!

love rarely rides in our stroller anymore and usually just walks next to the stroller. i have discovered that it's hard to hold onto a child's hand and push a stroller at the same time, so i decided that we needed handles on our stroller as well. i had several ideas...all which involved sewing some handles with cute fabric.

however, i decided i did not want to haul out the sewing maching and sewing supplies for such a little project. besides, i'm busy and would rather do it in a way that didn't involve sewing at all. i brainstormed about what else i could use to make them, and then it came to me - cheap elastic headbands.


i picked up a pack at the store (maybe you even have some laying around your house!), got out my duck tape (it happens to be neon pink...still left over from my color-coded organization when we moved), and within five minutes, i had four stroller handles.

all you have to do is wrap a piece of duck tape around the headband in one spot (to make the part for the child to hold on), loop it through your stroller, and walks just got easier and safer!


i wanted to use what i had (the neon pink), but they make duck tape in so many colors and patterns now that you could make them really cute.

we have two strollers. one is a lightweight single stroller and the other is a baby jogger city select single/double stroller. i attached two handles on each stroller...one on each side. i purposely used two different colors so that i can tell love "hold onto the blue handle" or "hold onto the purple handle" depending on which side of the stroller i want her to be on (away from the street).


these handles have made our walks much easier and love actually really enjoys (usually) holding onto the handle. jobot even tried out the handles when we walked at the zoo the other day, and he did really well. i also really like that they are elastic rather than just cotton sewed into a handle because i think the elastic of the headband absorbs some of the movements of the child so the stroller isn't constantly being impacted by their movements.


so, there it is. very simple.

* updated to add...today i took one of the handles off the stroller and looped it through the shopping cart at the grocery store. it was a huge help and i will be making another to keep in the diaper bag just for the store. 

(by the way...the baby jogger city select is seriously the best stroller in the world. it can be a single or a double, pushes easily, has a lot of storage, and is very compact for a double stroller. we love it! i am not being paid to say that either, it's just my opinion.)

Wednesday, December 21, 2011

play kitchen

in my last blog post, i mentioned that we made a christmas gift for our little girl. we made her a little play kitchen!


over the summer, i decided that our little girl needed to have a play kitchen. after researching wooden kitchens online (expensive!), and coming across several cabinets turned into play kitchens on the internet, i was inspired to create a kitchen for her.

we found the perfect cabinet at a used furniture store in september. it was exactly what i had in mind and it cost $43. over the last week, jeremy and i transformed it into a little kitchen and it's just perfect for her.

here's a before picture:

jeremy used our jigsaw to make a circle in the top to hold the "sink" (an old metal dog food dish that we had in our basement). we attached the sink with caulk. i bought two small wooden plaques and a package of wooden toy wheels at the craft store and painted them red for the burners and oven and sink knobs. i drilled holes into the cabinet and installed them. the knobs really turn, which makes them extra fun. i was stumped for a bit about how to make a faucet, until i came across a metal drawer pull at the local hardware store that looks very much like a faucet. it fits in perfectly.


and that is our daughter's kitchen. i love that it is simple, leaves a lot up to the imagination, is wood instead of plastic, has a lot of character, and doesn't take up a lot of space in our house.

cabinet: $43
sink: free
wooden plaques for the burners:  $1.58
package of wooden wheels: $3
caulk: $5
paint: free (already had it)
drawer pull for faucet: $3.50

total cost: about $56.50

to go along with this gift, we also invested in some wooden pots, pans, and plates and some wooden pretend jars of condiments. i started making felt food in the summer, so by the time we gave her this gift, i had made quite a collection. i will have to take a photo of all of the food (there's a lot!), but she has a chicken, baked potato, lots of fruits and veggies including an amazing banana, an ice cream cone with four different flavors of ice cream, an assortment of breakfast foods, a s'more, a donut, and a pop tart (organic and sweetened with honey, of course - haha!), some sandwich fixings, and a few more things i am sure i'm forgetting. her food is in wooden crates that fit inside of the cupboards (we already had the wooden crates).

of course, at the last minute, i decided that she really needed an apron to wear while she cooks, so i sewed one (i just made it up and it turned out to be really cute). i used fabric i had in my stash. i also made a little felt potholder and two napkins. we couldn't wait to give her the kitchen (and we've also been trying to spread her gifts out a bit), so we set up the kitchen so it was all ready for her when she got up from her nap on sunday.

all set up for her to see when she got up from her nap.
and her little table set... (sorry about the lighting, it was getting dark outside)

i brought her downstairs and she was SO excited. it made this mama and daddy very happy to see such a happy girl! she has hardly stopped cooking since. what fun!

our happy little cook!

Saturday, September 10, 2011

diy: bath toy holder

in our house in california, our bathroom had a nice little shelf where we stowed our little one's growing collection of bath toys. when we got home, we had nowhere to store them or let them dry out. i checked out the options at a few nearby stores, and found that the cheapest bath toy holder i could find was $8 (the most expensive was $30!). i did not want to spend that kind of money and decided to come up with something on my own. it turned out to be very simple and inexpensive.


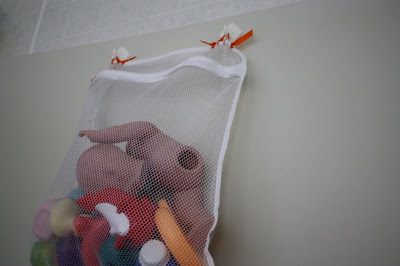
(please ignore the dismembered doll...trying to keep her from getting moldy!)

i purchased a lingerie bag for $1.49, found some ribbon in my stash, and sewed it through the top of the lingerie bag to make a hook.


the finished hook...i just used a very large needle and sewed through several times in a few different places.


then i filled it with bath toys and hung it in the shower. we already had two hooks that were in the perfect place for me to hang this, but if you don't, you could just install some 3M hooks, or try suction cups.


i actually love this better than the options i saw in the store. it is simple, it allows the toys to dry, and i can easily throw it in the washing machine if it starts to get dirty. i call this a success!

Sunday, July 31, 2011

homemade playdough

our little one is becoming more and more interested in working with her hands...coloring, mixing, cleaning, and playing with playdough!


i made a batch of it several weeks ago and she has played with it several times since. the first time i gave it to her, she stayed busy in her high chair for over an hour!

the recipe i used was:
1 1/2 cups flour
1/3 cup salt
2 teaspoons cream of tartar
1 1/2 tablespoons olive oil
1 1/2 cups water

put the dry ingredients in a pan on the stove, then add the water and oil. if you want to add color to your playdough, add it at this time as well. cook on medium heat and stir until it becomes thick. after a few minutes it will become one big glob of playdough that can't be mixed anymore. take it off the heat, put it on a plate or in a bowl to cool for a bit, and then use your hands to form it into a ball. if it is still sticky at this point, just add a bit more flour. i store ours in a recycled yogurt container and have kept it in the fridge in hopes that it will last longer. i made it at least four weeks ago, though, and it is still soft and use-able. easy, cheap, and natural playdough!

the smell totally brought me back to my own childhood because my mom used to make playdough for us! i'm glad my little girl can have the same experience as she grows up.

Monday, March 28, 2011

diy: busy wallet

this way-to-keep-a-little-one-occupied-during-travel will be tested on saturday when we fly across the country. we will be spending a little over five hours up in the air. since even waiting in our doctor's office waiting room with our daughter is quite an undertaking, i am a bit anxious about all those hours in an airplane with our very active toddler. 

i have been trying to come up with a variety of ways to entertain her during our trip. there will be snacks of course, some little toys and books, a little photo album (which i still need to put together) and some junk mail to open (i've been saving it for a few weeks). now i will be adding what i will call a "busy wallet" to the list of things to do.


this busy wallet is a budget-friendly and easy thing to prepare before traveling. it could also be used for a road trip, or kept in the diaper bag for those times of unexpected waiting with an antsy little one. 

to make your own busy wallet you need...a wallet, some paper or other material, and anything else you want to add (a pen, stickers, paper, maybe some coins for an older child). 

i didn't have an unused wallet laying around, so i purchased a wallet at a local thrift store for $1.99 (i thought this was a little pricey). i made sure to choose one that had a lot of pockets, pouches, and a zipper and snap.

i used one of the cards from my wallet to cut thick scrapbook papers to the size of cards. some of the papers have designs on them and some are solid colors with sparkles. i had a few sheets of shiny paper that is sticky on one side, so i stuck that on the back of the scrapbook papers to make it more interesting and fun. you could also include those fake credit cards that come in the mail, photos cut to size, or anything else that fits in the little pockets.
i added a pen to the wallet (our girl loves holding onto pens). and in the pocket for dollar bills, i put some larger pieces of paper.

this wallet has a zippered back pocket, so i filled it with stickers. our child is a bit too young to know how to put stickers onto paper, but she is fascinated by how they stick to her fingers. for an older child, i think it would be a fun idea to include letter or number stickers that can be stuck to the "cards" or papers in the wallet and can also be used as a learning tool.

let's hope this wallet keeps our girl busy for a good chunk of flying time! i will definitely report on how this worked for us after we test it out on our travels. i would love to know if you put one of these together and how it works for your child.

Saturday, February 5, 2011

how to make yogurt

last summer i purchased a yogurt maker and was very excited to begin the process of making our yogurt. we drink raw milk, and i wanted to take further advantage of all the benefits of our raw milk by making yogurt with it as well. after two unsuccessful attempts last summer, i was discouraged and gave up on the idea for a while. as we've recently made significant, healthier steps in the way that we eat, store-bought yogurt with additives (and often with sugar!) is no longer an option for us. 

so...out came the yogurt maker and a renewed desire to learn how to make yogurt. i scoured the internet for tutorials and combined all the information i found into what turned out to be successful yogurt making! 
i made some this morning and thought i would share how i do it...

i have a yogurt maker that has seven little jars, so i just fill one jar up and dump it in this pot seven times to get the right amount. i heat the milk to 110 degrees F to preserve the good things in the raw milk, and i stir it a lot so it doesn't scorch. i use a candy thermometer to keep an eye on the temp.


 while the milk is heating, i take the lids off all the little jars and line them up on the counter next to the stove.


when the milk reaches 110 degrees F, i pour it into this pyrex pitcher (not a necessary step, but it's easier to pour it into the jars that way). 


i add two tablespoons of my yogurt starter. i either use yogurt from a previous batch i've made (it can be used to make another batch, but after a few uses, it gets weak), or i use plain yogurt from the store (i just buy a little container of it). i have used normal yogurt and greek yogurt, and have found that greek yogurt gives the homemade yogurt a thicker texture, so we prefer that kind. 


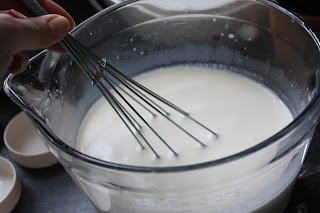
i use a whisk to mix the yogurt starter with the warm milk.


pour into clean jars.


put in yogurt maker and turn on to culture and make yogurt! i usually let mine culture in the yogurt maker for about 10 hours, then i put it in the fridge and it firms up a bit. i've heard of letting the yogurt culture for 24 hours, and i think i will leave one of these jars to culture for 24 hours and see what happens. i think it might end up too tangy for our taste, but it's worth a try!


and that is how i make yogurt. quick, easy, healthy, and cheap.


we eat it drizzled with raw honey, with frozen berries, oatmeal, or whatever else we can find to throw in. i also throw some in when i soak grains. sometimes hubby puts elderberry syrup in his. baby likes hers with mashed pumpkin and a sprinkle of nutmeg. yum.