Showing posts with label crafting. Show all posts

Wednesday, December 21, 2011

play kitchen

in my last blog post, i mentioned that we made a christmas gift for our little girl. we made her a little play kitchen!


over the summer, i decided that our little girl needed to have a play kitchen. after researching wooden kitchens online (expensive!), and coming across several cabinets turned into play kitchens on the internet, i was inspired to create a kitchen for her.

we found the perfect cabinet at a used furniture store in september. it was exactly what i had in mind and it cost $43. over the last week, jeremy and i transformed it into a little kitchen and it's just perfect for her.

here's a before picture:

jeremy used our jigsaw to make a circle in the top to hold the "sink" (an old metal dog food dish that we had in our basement). we attached the sink with caulk. i bought two small wooden plaques and a package of wooden toy wheels at the craft store and painted them red for the burners and oven and sink knobs. i drilled holes into the cabinet and installed them. the knobs really turn, which makes them extra fun. i was stumped for a bit about how to make a faucet, until i came across a metal drawer pull at the local hardware store that looks very much like a faucet. it fits in perfectly.


and that is our daughter's kitchen. i love that it is simple, leaves a lot up to the imagination, is wood instead of plastic, has a lot of character, and doesn't take up a lot of space in our house.

cabinet: $43
sink: free
wooden plaques for the burners:  $1.58
package of wooden wheels: $3
caulk: $5
paint: free (already had it)
drawer pull for faucet: $3.50

total cost: about $56.50

to go along with this gift, we also invested in some wooden pots, pans, and plates and some wooden pretend jars of condiments. i started making felt food in the summer, so by the time we gave her this gift, i had made quite a collection. i will have to take a photo of all of the food (there's a lot!), but she has a chicken, baked potato, lots of fruits and veggies including an amazing banana, an ice cream cone with four different flavors of ice cream, an assortment of breakfast foods, a s'more, a donut, and a pop tart (organic and sweetened with honey, of course - haha!), some sandwich fixings, and a few more things i am sure i'm forgetting. her food is in wooden crates that fit inside of the cupboards (we already had the wooden crates).

of course, at the last minute, i decided that she really needed an apron to wear while she cooks, so i sewed one (i just made it up and it turned out to be really cute). i used fabric i had in my stash. i also made a little felt potholder and two napkins. we couldn't wait to give her the kitchen (and we've also been trying to spread her gifts out a bit), so we set up the kitchen so it was all ready for her when she got up from her nap on sunday.

all set up for her to see when she got up from her nap.
and her little table set... (sorry about the lighting, it was getting dark outside)

i brought her downstairs and she was SO excited. it made this mama and daddy very happy to see such a happy girl! she has hardly stopped cooking since. what fun!

our happy little cook!

Sunday, October 30, 2011

little owl

we're not that into halloween over here, but it will be nice to spend tomorrow evening at a little halloween get together with some friends. there will be pots of soup, trick or treaters, costumes (on the little ones, not us), and most likely a lot of fun. i was inspired to make a costume for our little one and decided to turn her into a little owl. for the homemade owl costume, i just used materials i had in the house. i think it turned out to be so cute! when i tried it on her yesterday, she walked around saying, "hoot, hoot!"


isn't she the cutest owl you've ever seen?

Saturday, September 10, 2011

diy: bath toy holder

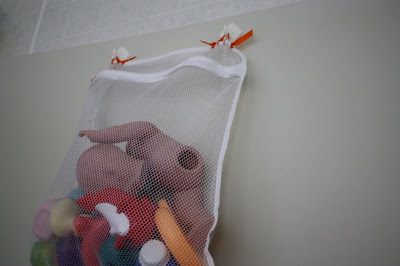
in our house in california, our bathroom had a nice little shelf where we stowed our little one's growing collection of bath toys. when we got home, we had nowhere to store them or let them dry out. i checked out the options at a few nearby stores, and found that the cheapest bath toy holder i could find was $8 (the most expensive was $30!). i did not want to spend that kind of money and decided to come up with something on my own. it turned out to be very simple and inexpensive.


(please ignore the dismembered doll...trying to keep her from getting moldy!)

i purchased a lingerie bag for $1.49, found some ribbon in my stash, and sewed it through the top of the lingerie bag to make a hook.


the finished hook...i just used a very large needle and sewed through several times in a few different places.


then i filled it with bath toys and hung it in the shower. we already had two hooks that were in the perfect place for me to hang this, but if you don't, you could just install some 3M hooks, or try suction cups.


i actually love this better than the options i saw in the store. it is simple, it allows the toys to dry, and i can easily throw it in the washing machine if it starts to get dirty. i call this a success!

Wednesday, August 3, 2011

homemade veggies

we have less than two weeks left in our house here. then we will spend a few days staying with family before we hit the road for home. we've been sick this week. my love was sick on monday...fever and all. i was achy for the last two days, but i struck up a fever during the night. today was my day to be ill. i do not have a fever tonight and am feeling slightly better. my hubby is at basketball camp at the church every night this week (except for monday when he was sick), which leaves me to do the night time routine on my own. difficult when i'm not feeling totally well, but it went okay tonight.

believe it or not, there's actually been some crafting going on around here.

i really wanted to have a garden this year...but when we found out that we were going to be gone from june through august this summer, i knew that was not going to be a possibility. i was bummed that i was unable to grow vegetables this year, but that did not stop me from "growing" some vegetables from wool felt!

i made them for baby...to stock the play kitchen i am planning on making for her when we get home.

i got this book for my birthday:


it had been on my wish list for a while, and i am really enjoying it! it has patterns for all kinds of felt foods, but also for a tool set, campfire, toy purse, and more things made out of felt!
the patterns are easy to use and the projects come together easily and quickly. 


i am proud to say that i finished all the vegetables in the book (minus the white radish...didn't think a white felt toy would stay white for too long, so i decided to skip that one!). 


this has been a really nice summer project for me as it doesn't take a lot of supplies and the outcome is quick and satisfying. and i love seeing baby's face when i hand her a new vegetable! there's nothing quite like putting time and effort into making something for her. that smile on her face when i hand her a momma-made toy brings me so much joy!


she had a hard time leaving the veggies alone long enough for this little photo shoot the other night. i didn't mind.


since finishing the vegetables, i moved on to fruits. so far, i've finished a banana and a pear. the apple and kiwi are next on my list.

i got my felt from this shop on etsy.
my needles and thread came from a sewing set i got for a dollar at rite aid (actually a pretty great set - it came with ten different colors of thread!).
and i've been using the plain old pair of scissors i brought along to cut the felt.
it's all working out alright, but i can hardly wait to get back to my sharp sewing scissors and my own collection of needles and thread.

Friday, March 25, 2011

pinwheel birthday party!

we recovered from our busy weekend and i'm excited to share the details of our little one's birthday party! the weather is still cold and unpredictable in our part of the world, so we had to limit the number of guests due to the size of our house and the fact that we couldn't spill out onto the porch or the front yard. i started thinking of ideas for this party for a couple of months now (i think it is how i got through the winter!). our daughter loves pinwheels, so i decided i wanted to incorporate those in her special day. it turned out to be a lot of fun!

i made the invitations and think they turned out really cute! i just bought a sheet of candle stickers and used scrapbook paper to make pinwheels.


i got a pinwheel lawn decoration this past winter (in hopes that spring would come someday!), so we put that out on the day of the party to continue the pinwheel theme. it's great because we can leave it out for the springtime. 


the birthday girl wore a mama made pinwheel barrette and a corduroy party dress.


for decorations, i made pom poms out of tissue paper and a pendant garland out of scrapbook paper and ribbon. i found some pinwheels in the dollar bin at target, so i put those in a vase as a decoration on the table.


i had plenty of help getting ready for the party, as my family was here from out of town for the weekend. we served water, iced tea, fruit kabobs, veggies and hummus, chips and salsa, and homemade pigs in a blanket.


i made honey-sweetened cupcakes, and a smash cake from the same recipe. the pinwheel cupcake toppers that i made were the perfect addition to the celebration.


our girl thoroughly enjoyed her smash cake and her party! i think the day was a success!


Thursday, February 3, 2011

snowed in

our dreams for a snow day began on tuesday afternoon. (jeremy works at an afterschool program, so whenever the school has a snow day, he does too!). they canceled the afterschool programs because of an impending blizzard, so we hunkered down at home. and then the blizzard came. and it snowed and snowed and snowed. and the wind blew. and we were warm and cozy in our little house. 

we woke to a world covered in white. and it was still snowing. and even my husband's seminary was closed, which was good because there was no way we could have gotten down our street or even out of our driveway. and so we settled in for a snow day. and what makes a good snow day at our house? 

 the back door that would barely open. we were literally...snowed in.


a porch covered with snow.


extra time for studies for him.


and coffee to go with them.


a bit of reading for me.


and lots of reading for her. this is one of her current favorites. she giggles every time we get to "c is for curtsy".


some baking. i have to be honest - i thought these cookies looked a lot better than they tasted. they were made with almond flour, honey, and a few other ingredients. the taste was a disappointment, but...they look good anyway.


some coconut flour bread. it was very yummy. especially drizzled with raw honey.


and some crafting. i finished this little bend friend, and i have a couple of other projects in the works. i need a name for her. any suggestions?


some flowers from my love. given to me pre-snow day, but they are still bright and blooming. the perfect little companions for a dreary day of snow.


jeremy has school today, but he has another snow day from work, so we will have some more extra time as a family. we are soaking it up. and the sun is shining today, so everything looks brighter.

Sunday, January 30, 2011

end of the weekend

craft night was a success. we made yarn wreaths, which was a great project to do together. we each brought our own supplies. this project was great for sipping tea and talking while we wrapped our wreaths with the yarn. then we gathered around the table to make and glue our flowers. it was quite fun. here's how mine turned out...


the weekend has been full. my love watched our little one yesterday and i headed out alone for a bit. i spent a few hours at a local coffee shop sipping on coffee and reading. it was so very relaxing. yesterday afternoon all of us (including the dog) headed out into the snow. we ended the day with homemade hot cocoa sweetened with honey (from this recipe).


sunday morning was blueberry muffins. mmm. we had nursery duty. our little one worked up the courage and went down the slide all by herself! she was so proud of herself, and so were we.

Thursday, January 27, 2011

felt wee folk

this past fall, i came across the book, Felt Wee Folk, by Salley Mavor. this book is incredible and Sally Mavor is so talented. the book has many different patterns and ideas for making "wee folk". i started out by making a couple just as the book says, and now i am branching off and adding my own style to these little friends. it's so much fun! 

i started calling them "bend friends". i find it wonderful that they are appealing to all ages. my mom loves them (i actually gave her one for christmas), and they are wonderful for children as well. even our ten-month old daughter loves looking at them. she will certainly have her own collection when she is older! i look forward for making them for her for special occasions as little gifts.

their arms and legs are made out of pipe cleaners wrapped tightly in embroidery floss, so they are fully bendable. the one pictured is about 2.5 inches tall, but the book shows how to make several different sizes. i freely cut out the flower petal skirt and the shirt, and added the embroidery to the shirt. i use wool felt for the clothing when i make these little friends. the head is simply a wooden bead. i always leave the faces blank in waldorf style. the hair is made out of naturally dyed wool roving. this is the first little friend i have made who doesn't have hair that is a natural color. i like the natural colors and plan on usually using them, but i think the blue hair fits this little one.


 this is the back. for other dolls, i have used artificial flower petals for the skirt and wings and i really like that look as well.


it is so much fun for me to make these little people. i will definitely be sharing other ones here as i make them.

some friends are coming over for craft night in a couple of hours. i'll be back in the next day or two to show you what we made!

Wednesday, January 19, 2011

fabric chandelier

there was some time for crafting this past weekend. i worked on a project that i've had on my list for a while. it's a fabric chandelier.


our little one has several paper lanterns and other things hanging in her room, and she absolutely loves them. when i saw the idea for this "chandelier", i knew it would be something that she would enjoy looking at and it seemed like it would be a fun and easy project. i was right!

i got the idea from this tutorial. i used regular embroidery hoops for mine, not quilting hoops because i didn't want it to be that large. i also used more material and used some thin and some thick strips of fabric. i had some of the fabric in my stash, and some of it was taken from the remnant bin.

i was thrilled to find this bird cage fabric in the remnant bin. it's just a joanne's design, but i thought it was so cute, it gave my chandelier the extra little boost that it needed, and it goes with all the bird things in the little one's room.


this project probably took me about 1.5 hours (with some breaks). i ironed the fabric, used my rotary cutter to cut it into strips, put the fabric strips around the embroidery hoops, and wired them together.

i worked on this project after the baby was in bed, so i hung it from our dining room ceiling lamp so i could admire it. i like it so much...i have to admit that it is still there. it helps with the january gloom we are experiencing lately. one of these days it will find it's way up to the little one's room.